Project Trunk
Project Trunk
"I look at every piece of furniture and every object as an individual sculpture."
- Kelly Wearstler
I was in need of a storage box to store my partners climbing gear in, something that isn't a plastic blue toy box! I was searching for a wooden trunk that would sit well in the bedroom that was a storage box but also a side table. I came across this trunk in our store and knew it would be perfect for my little project.

I thought this would be a quick and painless task of renovating a trunk, alas, it took much longer than I intended. The previous owner must have used industrial strength glue many years ago, which has bonded very well with the wooden interior.
I increased my hours on this project by being lazy and not using a proper metal scraper. You will notice at the start of the photos, the use of a cheese slicer... I couldn't find my metal scraper anywhere. Later on I realised this was taking up far too much time, effort and energy! It was time to stop being lazy and to get myself down to a hardware store to buy myself a new one. Ahhhh relief, it made a huge difference using proper tools and no more shall I dive into the kitchen drawers!
What do I need?
- Paint (I used Jot & Jumbles Hinterland chalk paint)
- Paint brush
- Metal scraper
- Paint stripper (Nitromors)
- Gloves
- Sand paper (Grit Medium 400)
- Wood treatment oil (Ikea, Skydd)
- Old rag
- Old toothbrush
-
To start I pulled and scraped off the paper from inside the trunk. Remove as much of the paper as you can, when you come to the glue/varnish this is where paint stripper is needed.


-
Make sure your hands are protected against the paint stripper, this is harmful stuff! Using your paint stripper apply as much as you can to glue/varnish areas. Follow instructions on your paint stripper tin. Don't be tempted to scrape off the gooey layers early, it needs time to eat away at the glue/varnish. And do not be too stingy, apply thick layers for best results.

-
Now it is time for the messy part! I used a toothbrush to help rough up the glue/varnish, this helped to get the paint stripper into all the cracks. Next use a metal scraper to remove the bubbled up glue/varnish and wipe it on an old rag, be careful not to get this on your skin.

-
Repeat steps 2 and 3 until you have removed all the glue/varnish.

-
Once all glue/varnish is removed, sand down the wood to create a smooth surface. My trunk did not have very much varnish or sharp pointy bits on fortunately for me, so a light sand did the job!

-
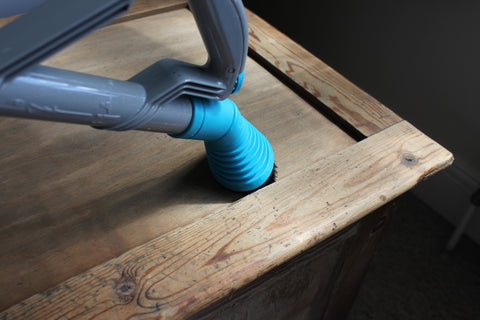
Next I hoovered all the dust and left over debris from the inside and outside of my trunk. This step is key to clean the trunk before painting and oiling the wood. You can even use a damp cloth to wipe the dust away.
-
Using your chosen paint, apply thin layers to desired location on your furniture. Once first layer is dry, apply another coat and so on until you get your preferred look. I used Jot & Jumbles Hinterland chalk paint to create my look. This paint is so easy and quick to apply, and it looks incredibly dreamy on my trunk!


-
After the paint has dried I used wood treatment oil and an old rag (in my case an old sock with holes in) to rub the oil into the wood. Again read your wood treatment oil tin and follow instructions for best results. You can see such an amazing colour transformation to the wood with just a little tlc!

-
Here in this photo you can see the clear difference between oiling your wood to leaving it untreated. Oiling the wood made a huge difference, right before your eyes the wood comes alive with beautiful rich colours that haven't been seen for years.


-
Place in chosen location to be admired by all.


Trunk - The Furniture Recycling Shop £60
Paint - Jot & Jumble (1 Litre tin) £7.95